


React Native as we know, helps develop mobile apps using JavaScript. On the surface, it is just like React, except that it uses native mobile components instead of web components as the building blocks.
How does React Native work?
In a web browser, to render interactive user interfaces, the browser's DOM needs to be edited. In React, this is handled by the Virtual DOM.
Virtual DOM is a virtual representation (programming concept/pattern) of the DOM kept in memory and synced (reconciled) with the DOM by a library like ReactDOM.
In a nutshell, Virtual DOM acts as a layer between the developer's description of how things ought to look and the actual work done to render your application on the screen. React Native uses a bridge to communicate with the native components of the respective platforms like IOS, Android etc. A simplified depiction of this flow is shown below...
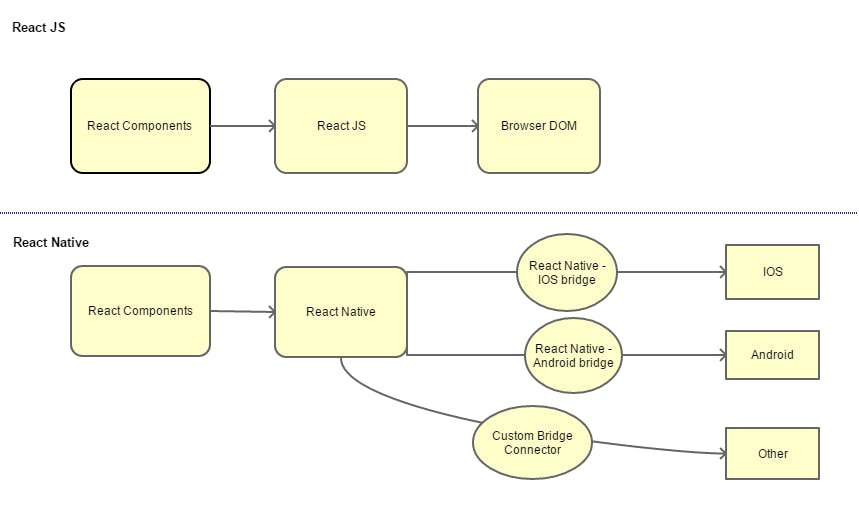
There is a lot that happens behind the scenes on the bridge. I'll probably take that up in a separate blog post. For now, it is sufficient to understand that it is this bridge that helps the JavaScript layer to communicate with the Native components of the respective platforms.
With this high-level understanding, let's proceed with the steps to develop a simple Hello World application using React Native and view the same in Android.
Steps to create a React Native application
I'll be developing this application in windows. The steps should be similar whether you are using Mac or Linux.
1. Install the latest version of Node.js
Install Node.js from here. I would recommend you install the latest LTS version.
Verify node is installed using
  C:\Users\sundeep>node -v
  v8.11.4
2. Install the Command Line Utility
Install the
create-react-native-appcommand line utilitynpm install -g create-react-native-app
3. Create our React Native app
We can now create our React Native app using the command line utility as
create-react-native-app HelloWorld
Once the project is created successfully, cd into the project and start the development server
D:\Dev\ReactNative\Apps>cd HelloWorld

D:\Dev\ReactNative\Apps\HelloWorld>npm start

> HelloWorld@0.1.0 start D:\Dev\ReactNative\Apps\HelloWorld
> react-native-scripts start

13:05:15: Starting packager...
Packager started!

Your app is now running at URL: exp://192.168.0.106:19000

View your app with live reloading:

  Android device:
    -> Point the Expo app to the QR code above.
       (You'll find the QR scanner on the Projects tab of the app.)
  iOS device:
    -> Press s to email/text the app URL to your phone.
  Emulator:
    -> Press a to start an Android emulator.

Your phone will need to be on the same local network as this computer.
For links to install the Expo app, please visit https://expo.io.

Logs from serving your app will appear here. Press Ctrl+C at any time to stop.

 › Press a to open Android device or emulator.
 › Press s to send the app URL to your phone number or email address
 › Press q to display QR code.
 › Press r to restart packager, or R to restart packager and clear cache.
 › Press d to toggle development mode. (current mode: development)
4. Install the Expo client app to Run the React Native application
Unlike React js apps, whereby the output can be viewed in a web browser, React Native apps can be rendered either in an emulator or mobile devices.
Expo client is one such app that can be installed on android or ios and we can run our application from the respective device.
Once you have installed the Expo client, register yourself on it. Ensure that this app connects to the same wireless network as our computer.
On Android, use the Expo client to scan the QR code from the terminal. This will run the Hello World app that we created on the mobile device.
Follow the instruction on the terminal for the ios platform if that is your platform of choice.
App.jsfile in theHelloWorldproject has some boilerplate code that renders the initial screen. You may consider replacing this with the following code snippet.
import React from 'react';
import { StyleSheet, Text, View } from 'react-native';

export default class App extends React.Component {
  render() {
    return (
      <View style={styles.container}>
        <Text>Hello World!</Text>
      </View>
    );
  }
}

const styles = StyleSheet.create({
  container: {
    flex: 1,
    backgroundColor: '#fff',
    alignItems: 'center',
    justifyContent: 'center',
  },
});
The app hosted on your mobile device will now refresh and display the text Hello World!.