


In my earlier post we saw how Azure Resource-based Virtual Machines can be accessed using ARM APIs and a Native application registered in Azure Active Directory (AAD).
However, as part of that walkthrough, we assigned the Reader role to the Native application. This meant, that we had assigned limited RBAC (Role Based Access Control) privileges which allowed us to only read details of the Virtual Machines and other resources in Azure.
If in addition to monitoring the resources in Azure, we wish to perform tasks like (say in the case of virtual machines) shutting down the VM or restarting the VM etc., then we would need some elevated privileges.
Azure provides the concept of Roles to manage privileges and in turn RBAC. Azure already provides several predefined Roles out of the box. We can assign one of these roles based on our requirements.
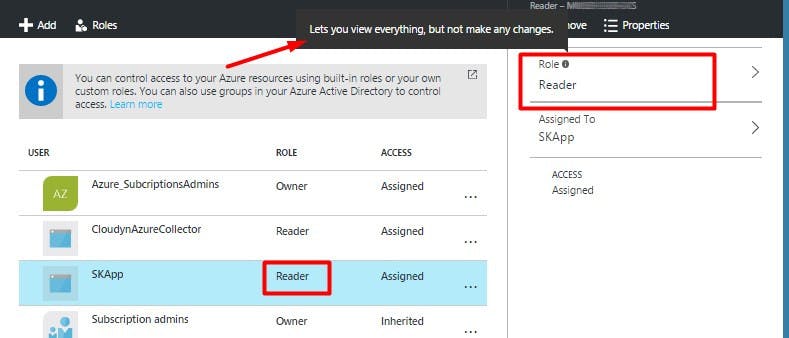
For our example, let us consider the Virtual Machine resource. In the earlier post, we had assigned a Reader role, with which we could monitor the Virtual Machines. If you check the tooltip of this Role on the portal, it clearly states that you can view everything, but not make any changes.
To understand this better, let's drill down (click) on this role further. You'll find that a new blade opens up to the right listing down all the Resource Providers and their corresponding permissions.
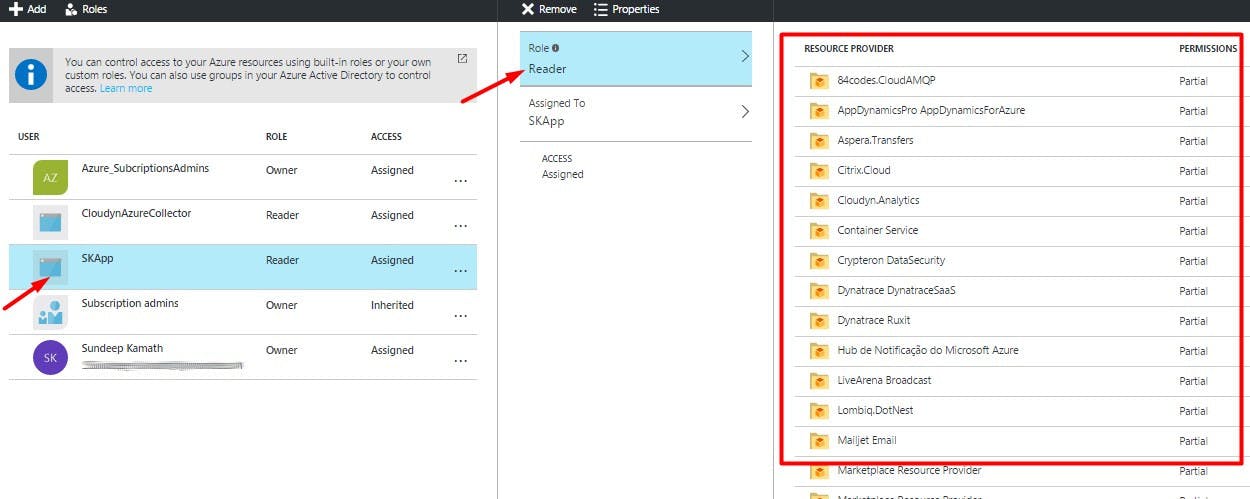
Now, in Azure resources are categorized in various buckets called Resource Providers. In our example, since we are interested in the Virtual Machine resource we would further drill down on the Microsoft.Compute Resource Provider.
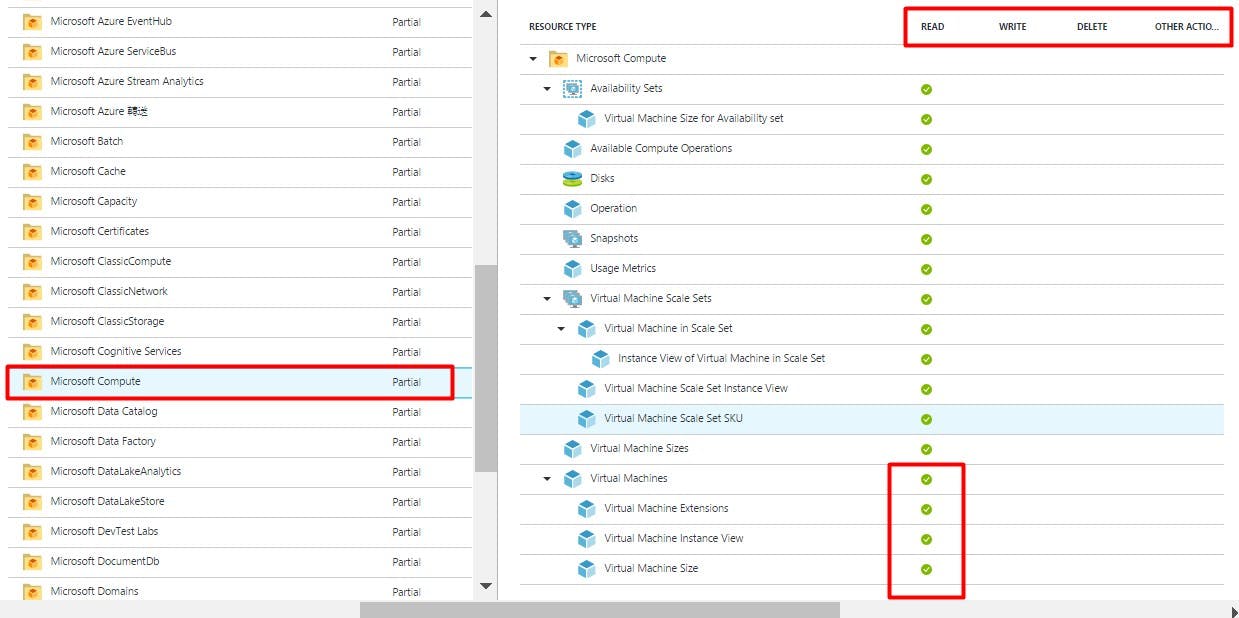
As shown in the screenshot above, check the permissions assigned to the Virtual Machines resource on the right. These are read permissions only. We can further validate this by a quick drill down on the Virtual Machines section.
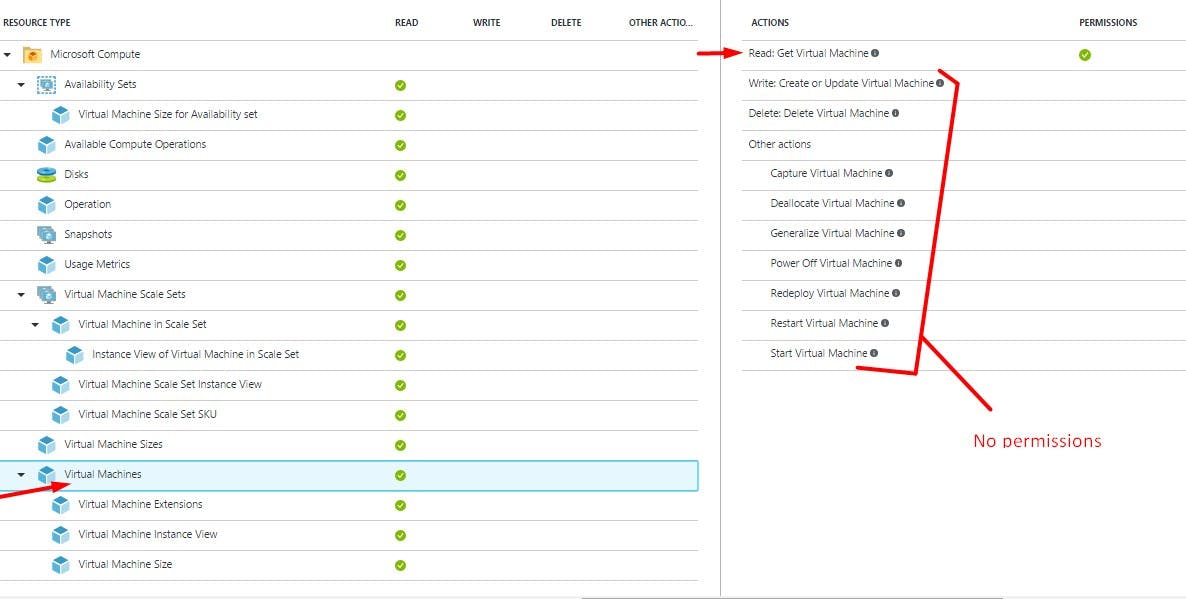
A new blade opens up to the right and you'll find that we have only Read only rights on this resource.
While this serves the purpose of monitoring this resource, what if we wish to say delete this virtual machine or maybe power off this machine?
There are 2 ways to handle this...
Assign a Predefined Role with additional privileges.
Create a Custom Role with just the privileges we wish to assign.
Let's go through option 1 first.
1. Assign a Predefined Role from Azure with the additional privileges
As I mentioned earlier, Azure provides several predefined Roles out of the box. We can look through these and select one that serves our purpose.
Now, with this in mind, we could for example assign the role of Virtual Machine Contributor instead of the Reader role that we had assigned earlier.
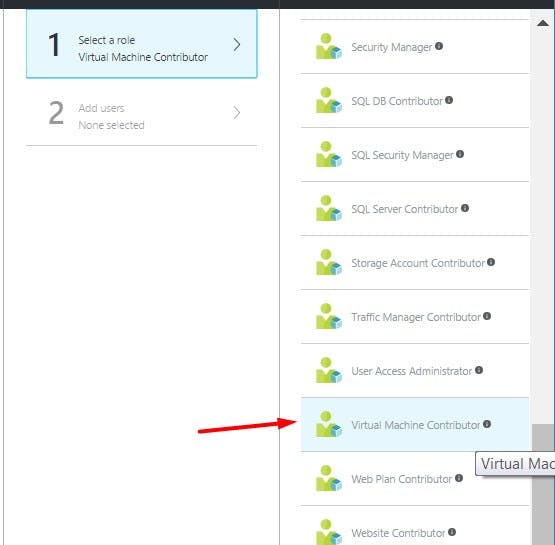
If we further drill down this role up to the Virtual Machine section, we'll find that this role provides full permissions on all aspects of the virtual machine.
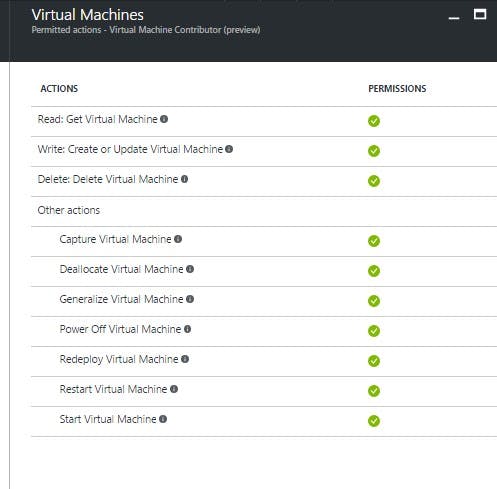
This will help us achieve our purpose of say powering off a virtual machine. However, this role is granting additional permissions like say deleting a virtual machine etc. which was not a requirement.
So for all such use cases whereby we need certain elevated privileges, we should first check if Azure provides certain roles out of the box and if they serve our purpose. If that is not the case, either because such a role does not exist or because the existing role has certain additional privileges that we don't require, then we should consider the 2nd option of creating a custom role.
2. Create a Custom Role with just the privileges we wish to assign.
At this point, the Azure portal does not provide a way to create a custom role via a user interface. There are 3 ways to create custom roles
I'll focus on how we can create a custom role using Powershell scripts.
2.1 Install Azure Powershell
You would need to have Azure Powershell installed on your machine to run these scripts. If you don't already have it installed, you can follow the steps from this link.
2.2 Define Custom Role using JSON schema
Now for our use case, we'll create a new custom role such that we continue to retain read-only rights on all Azure resources like earlier, but also grant an additional permission to power off (shutdown) virtual machines.
To do this we need to create a JSON file with the following parameters...
{
    "Name":  "SK Custom Virtual Machine Role",
    "Description":  "Lets you view everything and stop virtual machine instances.",
    "Actions":  [
                    "*/read",
                    "Microsoft.Compute/virtualMachines/powerOff/action",
                ],
    "NotActions":  [

                   ],
    "AssignableScopes":  [
                             "/subscriptions/<Enter subscription id>"
                         ]
}
Let's now go through each of the parameters in this JSON.
Name You can assign a name to this Custom role.
Description This is a brief description stating the permissions granted by this custom role.
Actions Here we specify the permissions that need to be granted and the Resource Providers on which these need to be granted. The first value
*/readspecifies that read-only permissions need to be granted to all Azure resources. The second valueMicrosoft.Compute/virtualMachines/powerOff/actionspecifies that the permission to power Off (or shutdown) the Virtual Machine be granted.NotActions This offers a convenient way to create a set of allowed operations when specific operations need to be excluded. If the set of operations that you wish to allow is more easily defined by excluding restricted operations then you may use this option.
AssignableScopes This specifies the scope within which the custom role being created is available for assignment. We can specify the scope at subscription, resource group or resource level. In our case, I have assigned it at the subscription level.
Once done, save this file. I have saved it as SK_Custom_VirtualMachine_Role.json
2.3 Create Powershell script to create the custom role
Now that we have our custom role defined, let's create a Powershell script that would consume this JSON definition and create the new role.
# Login to Azure using an account with Owner or User access administrator role.
Login-AzureRmAccount -ErrorAction Stop

"Attempting to create a new custom role"

# Create a new custom role which has
# * Reader role rights as well as
# * the right to power off virtual machines.
New-AzureRmRoleDefinition -InputFile "SK_Custom_VirtualMachine_Role.json" -ErrorAction Stop

"Operation executed successfully."
Note: Ensure that both the JSON file and Powershell script are in the same directory. If not, you'll need to provide the absolute path of your JSON file in the Powershell script.
During execution, the script will pop up a dialog for authentication.
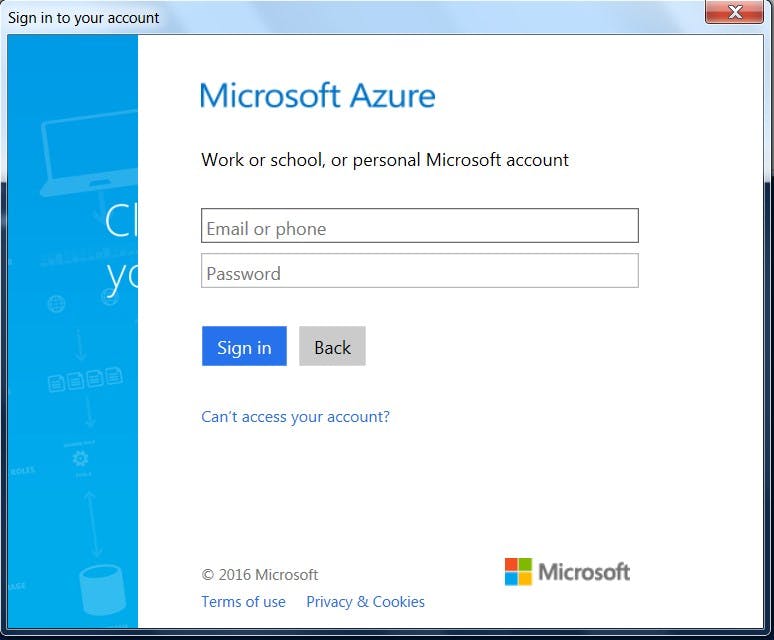
You need to provide credentials of a user account with an Owner or User access administrator role.
Once the script executes successfully, it will output a result like ...
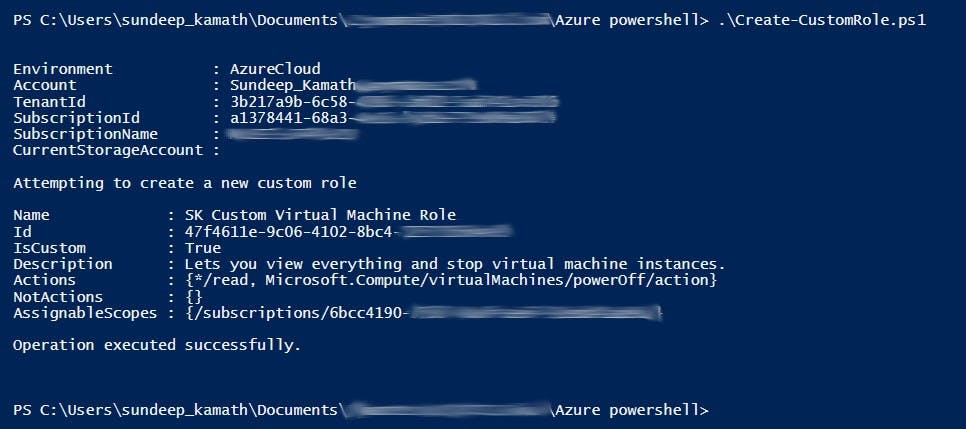
With this, the new custom role would now be visible in the Azure portal against the subscription that we specified in the scope section of the JSON definition.
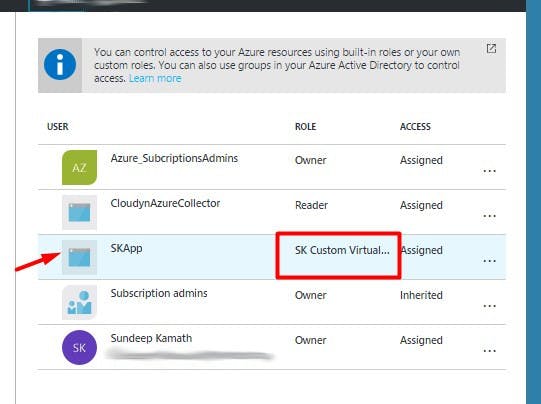
3. Assign a newly created Custom Role to the Native application
We can now assign this custom role to our Native application SKApp like we did earlier.
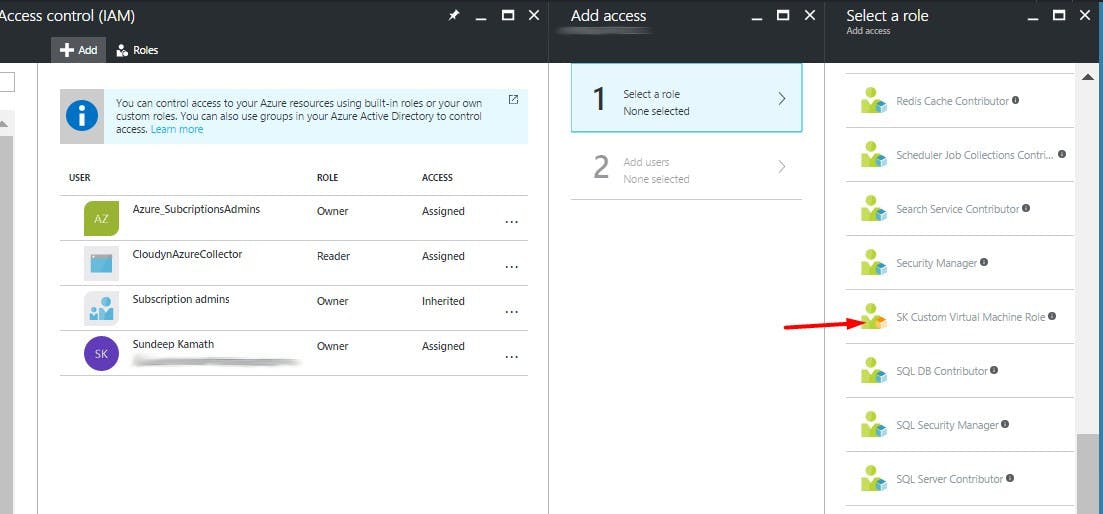
Once assigned, the Native application would be listed with the Custom Role in the Access Control section.
4. Create a console application and power off the Virtual Machine
We can now use the same C# console application that I had shown in the earlier post to programmatically power off the Virtual Machine using REST APIs.
There are only a couple of changes required. The REST API URL to power off the VM instance will change.
using System;

namespace AzureNewPortalResourceVMIntegration
{
    class Program
    {
        static void Main(string[] args)
        {

            string tenantId = "<Enter Directory Id>";
            string clientId = "<Enter Application Id>";
            string secretKey = "<Enter Secret Key>";
            string subscriptionId = "<Enter Subscription Id>";
            string resourceGroupName = "<Enter Resource group name>";
            string virtualMachineName = "<Enter Virtual Machine name>";

            string oauthUrl = "https://login.microsoftonline.com/{0}/oauth2/authorize";
            string serviceResourceId = "https://management.core.windows.net/";

            string authority = string.Format(oauthUrl, tenantId);

            //Rest API to power off Virtual Machine
            string stopVMURL = $"https://management.azure.com/subscriptions/{subscriptionId}/resourceGroups/{resourceGroupName}/providers/Microsoft.Compute/virtualMachines/{virtualMachineName}/powerOff?api-version=2016-03-30";

            string accessToken = AzureAD.Authenticate(authority, serviceResourceId, clientId, secretKey);

            if (accessToken != null)
            {
                AzureRestClient.ExecuteRequest(accessToken, stopVMURL)
                     .ContinueWith((task) =>
                     {
                         Console.WriteLine(task.Result);
                     });

            }
            Console.ReadLine();
        }
    }
}
Also, an HTTP POST request needs to be sent. Hence the AzureRestClient.cs file would need to be updated as...
using System.Net.Http;
using System.Net.Http.Headers;
using System.Threading.Tasks;

namespace AzureNewPortalResourceVMIntegration
{
    internal class AzureRestClient
    {
        internal static async Task<string> ExecuteRequest(string accessToken, string url)
        {
            string serviceBaseAddress = url;
            string responseMessage = null;

            HttpClient httpClient = new HttpClient();

            httpClient.DefaultRequestHeaders.Authorization =
                new AuthenticationHeaderValue("Bearer", accessToken);

            //Http POST request is issued
            HttpResponseMessage response =
                await httpClient.PostAsync(serviceBaseAddress, new StringContent(""));

            if (response.IsSuccessStatusCode)
            {
                responseMessage = await response.Content.ReadAsStringAsync();
                return responseMessage;
            }
            else
            {
                responseMessage = await response.Content.ReadAsStringAsync();

                if (response.StatusCode == System.Net.HttpStatusCode.Unauthorized)
                {
                    return "Access denied.";
                }
                return responseMessage;
            }
        }
    }
}
The AzureAD.cs file continues to remain unchanged as before.
using Microsoft.IdentityModel.Clients.ActiveDirectory;
using System;

namespace AzureNewPortalResourceVMIntegration
{
    public class AzureAD
    {
        internal static string Authenticate(string authority,
            string serviceResourceId, string clientId, string secretKey)
        {
            AuthenticationContext authContext = new AuthenticationContext(authority, true);
            AuthenticationResult authResult = null;

            try
            {
                authResult = authContext
                    .AcquireTokenAsync(serviceResourceId,
                                new ClientCredential(clientId, secretKey)).Result;

                if (authResult != null)
                    Console.WriteLine("Auth Token: {0}", authResult.AccessToken);
                else
                    throw new Exception("Azure AD authentication failed.");

            }
            catch (AdalException adEx)
            {
                Console.WriteLine("Exception: {0}", adEx);
            }

            return authResult.AccessToken;
        }
    }
}
Once the request executes successfully, you will find the Virtual Machine would be in the Stopped state in the Azure Portal.

Similarly, you can create various custom roles based on your requirements. Remember, the best practice from a security standpoint is to always assign as much privilege as is required to get the job done. Never elevate privileges unless it is necessary.
Hope this post was useful!
References: